Roman blind tutorial...

Monday 26 January 2015
How tricky can it be?...

I posted a picture on Instagram last week showing a Roman blind I made for my bathroom and it got a whole lotta love (likes)! I was very appreciative of this, as I always am but particularly this one as it has been something I have been very nervous about making. 

First of all I was tempted by the tutorial in 'The Great British Sewing Bee' book but it wanted you to put the channels for the dowels into the blind by sewing pin tucks into the lining. The maths worried me and I needed a super simple tutorial to start me off so, after a lot of time on Pintrest, I went for this one on the 33 Shades of Green Blog

This one suggested making separate pockets, that you stitch on afterwards, for the dowels and I thought this would take away the scary maths calculations. 

I'm not sure I would do the pockets again, for various reasons. I'll get to that later... 


If in doubt, stripe it out...
So I have the tutorial I want, I have the measurements, now for the fun part, choosing the fabric. I knew I wanted a stripe (I always want a stripe) and after a little nosey around old faithful, Dunelm, I decided on the one in the picture above. At £11.99 per metre I was happy with the quality and the price. The total cost of this blind (with some old bits of wood from the garage for fixtures) came to around £40, which considering the cost of custom made Roman blinds I thought was pretty reasonable. 

So, on with the make. As usual I'm not going to do a step by step guide as the tutorial I have linked is great but I hope you will read this before you do it and learn from my mistakes.


After measuring my fabric to the required length the tutorial asks you to iron a 2 inch hem  along the sides and bottom of both the front (patterned) fabric and the lining...


... what I particularly liked about this tutorial was these mitred corners. I had never seen this before and I'm not sure when else you could use this method and what for but look how neat and tidy these corners are! 


 Later on in the project you will use these tidy corners as little envelopes for a weighty piece of wood for the bottom of the blind. I didn't realise this until that point in the instructions and I'm not sure why, but I thought it was really neat! 


Once you have ironed down 2 inch hems along the sides and bottom of the two pieces of fabric lay them on top of each other, wrong sides together.

Little tip here; lay them out and pin them. Corners first, then the middle of each side. Make sure you pull the lining fabric pretty taut. I think my lining was a little saggy. This wasn't really a problem but I think if the lining was tighter it would look more professional. Now, pin pin pin, and when you think you have pinned enough pin some more. I'm a lazy pinner and this was not a good trait to have on this project, I'll get to that in a little while.    


Now you are at the point where you have to make long pockets for your dowels. There are some clever measurements that you need to follow for this part and the linked tutorial tells you all of that. But this is where I made some mistakes and after this I'm sure I would think again about whether to make the channels through the pin tuck method rather than these pockets. 

The major issue with this method is the ability to stitch in a straight line. I thought I was pretty good at this but lazy pinitus got me again. 


So the pockets look all lovely and straight here but...


I didn't pin enough (again!!!!) and I went a bit skewiff :-(

Now, this isn't the biggest problem for these blinds, as I do not intend to have them drawn and I only went wonky on the last pocket. As you have to stitch through both pieces of material you can see the top stitching on the front of the blind. Therefore, if you intend to draw the blinds, take my advice and pin pin and pin again so that your channels are super duper straight!

The tutorial gives you some suggestions about how to fit the blind to a baton. I didn't have a staple gun so I used drawing pins, not perfect but fine. It also suggests that you fit the blind to the baton above the window with Velcro but the blind was far too heavy so it ended up being drilled. 


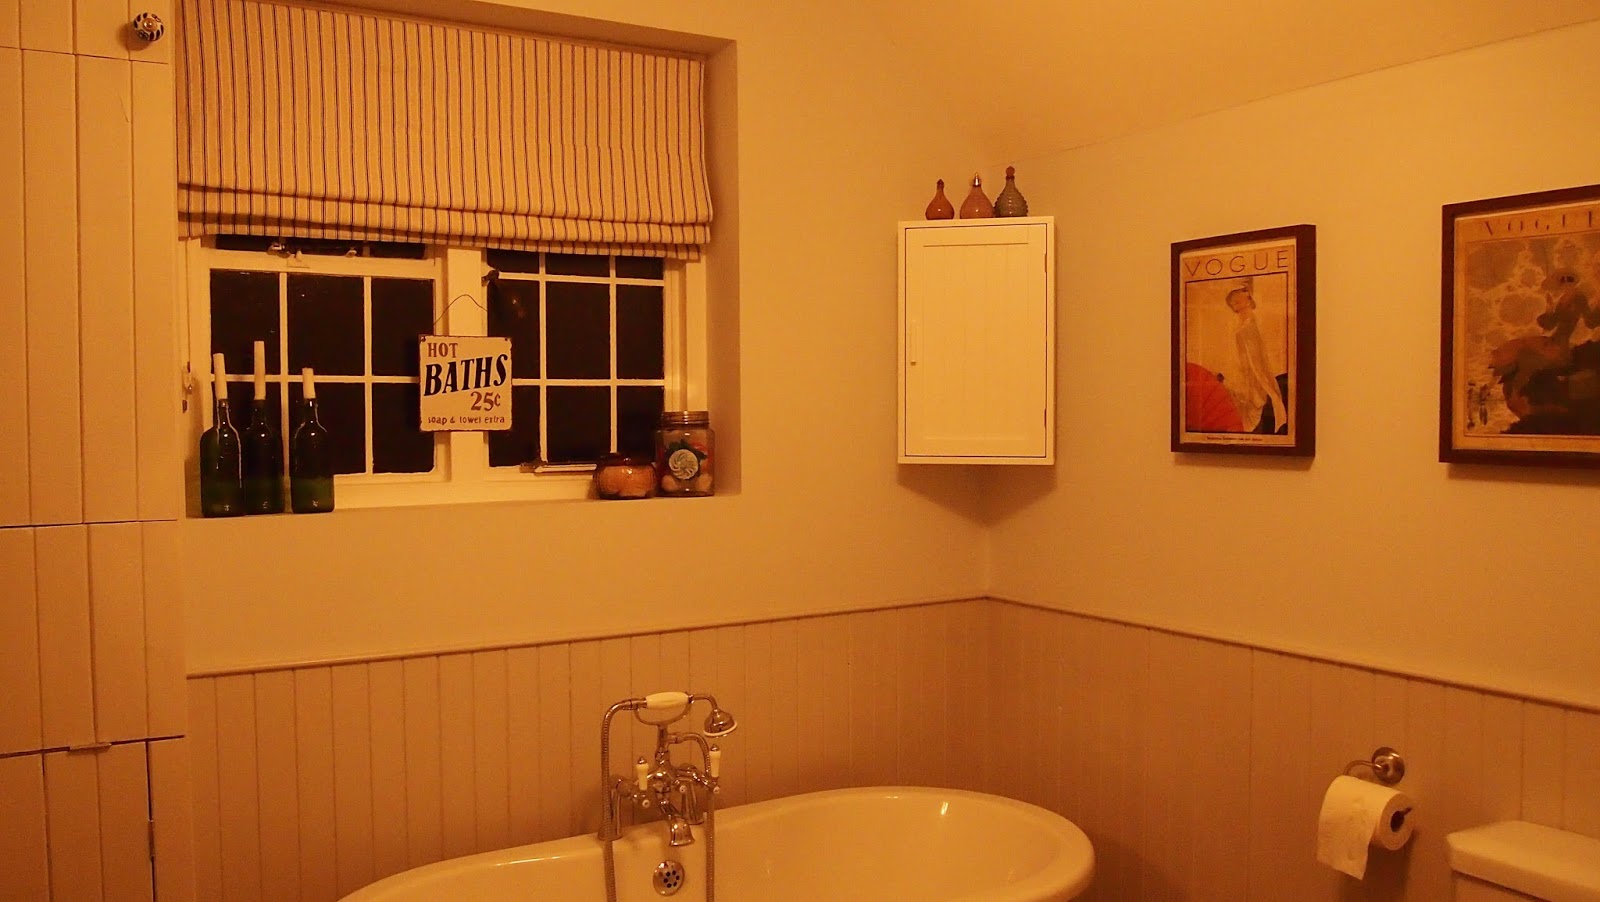
So here it is in situ and as I said previously you can't see the wonky stitching when it is open but when it's closed it doesn't look so great. 


Next time I would definitely go with the pintuck option. For 1. If my top stitching is poor it doesn't matter so much and 2. The maths isn't as scary now I look at it again. 

I'm hoping to make another one of these blinds for the landing window in the near future. That window is much bigger than this one so I'm glad I had a practice run first. I'll no doubt blog about that project and hopefully you will see an improvement. 

All in all I am very happy with the finished result and I am glad that I took the plunge into the scary world of window dressing.

Do it! I'm sure you'll be fine.

Amy x

A Line Pinafore Dress - A Tilly And The Buttons Pattern Hack

Sunday 18 January 2015

A little black dress...

Hi guys! Just before I get started on this weeks post I just wanted to say, I know it's early days, but I'm really enjoying this new little hobby and thank you for all the lovely things you've been saying, it means a lot. 

So on with the post...


Take one Delphine Skirt and one Pinafore dress...

I've been after a little black pinafore dress for a while now but never got round to buying one. Then for Christmas one of my lovely auntie's bought me 'The Great British Sew Bee' 2nd book. I really loved the first one so I was eager to see what was going on in this one. I was instantly drawn to the guidelines on how to make a pinafore dress and couldn't wait to use the guide for my next make.


Just whilst I'm on the subject of this book I just wanted to say how great it is. I think the first one in the series presumed you had some basic sewing skills but this one, along with the great patterns, has a big old section on all the ins and out of sewing. I'm still fairly new to dress making, I had my first sewing machine only 2 years ago, and apart from one little lesson from a friend a while ago I am pretty much self taught. Therefore, I will always find books like this useful as I am still learning. So if you're just starting out or thinking about sewing I'd say put this book in your wish list, I think it would be a great help. 


Anyway, the pattern asked for you to start by making up your favourite A-line mini skirt. No hesitation there, it had to be Tilly and the Buttons Delphine skirt. Just so you know I love love LOVE Tilly and the Buttons patterns!!! Not only are they super duper stylish, they are, by far, the clearest patterns I have come across. I made one a while ago and completely copied the way Tilly styled hers...

Well, if it ain't broke don't fix it ay?!


 Again, this book is brilliant for newbies (for the hints and tips) or the more experienced, just for the absolutely beautiful wears you could make. You must go and check out Tilly and the Buttons website. The blog posts are a great read and the step by step instructions she provides, for some of her other patterns, never fail to produce super neat, super cute items of clothing. I honestly love this site! 

So I chose a black denim look fabric that had a bit of stretch for the dress and on I went with the skirt. I particularly like the chunky waistband on this skirt and I think it works well with the bib of the pinafore because looks like a belt. 


In the Sewing Bee book it asks you to get to the point on your skirt before you attach the waistband and then attatch the bib of the pinafore but I just couldn't fathom how this would work. I dunno, maybe I was being silly but I just couldn't see it. So I fully completed the skirt then attached the bib... It also suggests you put two pieces of fabric together so you would have a seam up the front of the bib but I didn't have a seam up the front of the skirt so I thought it would look a little disjointed, so I just used one piece of fabric (measuring 12 x 14in)sewn with a 5/8in seam allowance. I then attached two cute anchor buttons, which you can't really see to clearly on the pictures. 

Always have to have a bit of nautical(ness) involved!

The straps where measured at 6 x 14in each, which was a little long but easy to fix after your have put your buttons holes in. I really like how the straps cross over at the back. When you sew them at the back of the skirt put them at a bit of an angle so they follow how they will go over your back (does that make sense?!?) 


So here is the finished article...


I love love love this dress! I wore it last night for my dad's birthday celebration and a stranger asked where she could get it from, result! (But my dad thought I was a waitress at one point, tut!)

I'm already planning on making a denim one, maybe even a light denim for the summer. This could be so versatile. 

I love to see if any of you try out this little pattern hack. 
Thanks for reading!

Amy x

Kitchen Transformation

Saturday 10 January 2015
The Heart of the home...


If you know me, or follow me on Instagram, you will know that over the past 18 months we have been ripping our house apart and putting it back together again. I am about to share my favourite part of the project and probably the biggest transformation of the whole house, the kitchen. 

When we first viewed the house I fell in love with it and one of the main reasons (other then the hallway, which I'll probably share with you when it's complete) was the kitchen. That last statement may surprise you when you see some of the before pictures...


The kitchen was very small and hadn't had any work done to it in about 20 years but I could see huge potential. Throughout this whole renovation I've always been able to visualise the exact end result, something which my partner in crime struggles with. I can honestly say on the first viewing I could see how it would look today.


This picture of the dining room was taken on the day we moved in. This room had always been used as a living room by the previous owner but I've never lived with the lounge at the back of house and it wouldn't of made any sense with the plans I had in mind.


So what happened first? We toyed with the idea of extending the kitchen out into the garden but a similar thing was done at my dad's house and the dining room became redundant so I really didn't feel it was necessary. I wanted to make sure we were using all of the space downstairs efficiently before we added any extra space and I think living with it how it was originally for 9 months, really helped us to visualise how we would use the space best. So... no walls were built but walls sure came down!!!
When I look back at these particular pictures
 I can't believe how far we have come!!!


When that wall came down it just flooded the rooms with light. The house is south facing so we get sun on this part of the house all day long and I just love it!

We worked really hard with the builder to make sure he understood what we wanted from the space... a nice big open plan space, a social space! We had new windows and french doors fitted. The doors open up into the garden and they are never closed during the warmer days.

Next came the units. Our builder advised us really well with regard to units and fixtures and we ended up with a kitchen from a company called Four Seasons. The quality of the units are really great and I just love the colour. The builder tried to talk us out of a wooden worktop due to the maintenance they require but I wasn't having anything else and who minds oiling it every so often when it looks so beautiful. 

So here is the finished product....

I love it so much!

It really is a dream space and exactly what I thought we could achieve on that first viewing. It looks so much bigger then it was even though nothing has been extended. 

I especially love the details that have been added afterwards, that was the fun part. Like the Garden Trading pendant lighting above the breakfast bar. The dresser and the table (which I'll blog about in the future) tie the two rooms together so beautifully. 

I also love this modern take on a Belfast sink...
I have a bit of an obsession with Emma Bridgewater, you may have noticed. 
We couldn't have a real Belfast sink due to the location of the dishwasher but I think this is a great alternative.


Oh and not forgetting my cute little pantry, which I had to work really hard  at saving, (the other half didn't have the vision for it) is one of my favourite features  of our 1920's house. 


So that's it, the heart of the home all done! 

Sorry if that was a bit of a long post and you lost interest, but it one of our proudest achievements throughout the whole renovation as it is such a great space to use. We both love it to bits. 

I hope you find some inspiration if you're about to tackle a kitchen refit, and I'm happy to answer any questions if you think I maybe able to advise you on your project.

Amy x 

Marmalade and Whisky Bread and Butter Pudding

Sunday 4 January 2015

What to do with all these jars?...

First of all, welcome to my first proper blog post. I decide to start with something simple and show you how I made this Bread and Butter pudding...
               http://www.bbcgoodfood.com/recipes/251622/marmalade-and-whisky-bread-and-butter-pudding

So Christmas is over and if you're anything like me you are willing the first daffodils to pop up out the ground... but whilst you're waiting, let's carry on eating some hearty grub and enjoy these cosy evenings just for a little while longer.


For some reason, this Christmas, lots of gifts that were given to us were chutneys, jams and other preserves. I do like a nice bit of preserve(!!), maybe I've mentioned it to a few people, I'm not sure... Anyway, we ended up with tons of marmalade! I'm not the biggest fan of old marmalade but after a bit of searching on the net I decided to use the orange jam to help me make Marmalade and Whisky Bread and Butter Pudding. 

I'm not going to do a step by step guide as I think the link above is best for                           that but here is how I got on.


     Making little marmalade sandwiches
(SANS CRUSTS!)


Start by making little marmalade sandwiches with day old bread. Do try and use older bread as I used a mixture of new and old and I could tell a difference. The fresher bread was more stodgy in the finished product. Oh, and don't forget to cut off the crusts!


The custard that the recipe asks you to make is so delicious and really simple, just stick it all in a bowl and mix. The marmalade I used already had whisky in and the recipe asks for 1 table spoon of whisky, I think you could probably but a little more in there then that, but I do like boozy puds. Next time I'd also think about using one of those honey whiskies, I think that would add an extra bit of sweetness.


The finished product
It's recommended that the dish is cooked for 45mins-1hr, I went for the whole hour as there was a lot of custard in there and I wanted to make sure it was cooked through. When I bake this again I'd probably cook it for another 15 minutes. My dish was pretty deep and I think the custard could have thickened up even more. 


So what do I think of this recipe? So easy! Seriously easy. Also I think it could be quite adaptable, like the honey whisky I mentioned earlier, or add some extra dried fruit if you fancy. I think I would add an extra bit of caster sugar to the top of the pudding too, just to help it all caramelise. I will definitely be whipping this one up again before Spring arrives. Enjoy! 

Amy x 


New Year, New Thing...

Thursday 1 January 2015

So I thought about it for a while and I've decided to give it a go. Let's see what all this blogging fuss is about. 


If you're reading this you've probably made your way here from Instagram. First up I LOVE INSTAGRAM! Since learning to sew, a couple of years ago, I have been using Instagram as a tool to share and gain ideas for all sorts of sewing projects and what a tool it is! 

Anyway, through Instagram I've stumbled across lots of inspiring  people in the sewing/crafting/interiors mini community that's going on over there and I though why not go a little bit further (like lots of other folk on there) and start documenting it here in this blog.

So what can you expect? I'm hoping it's going to be a place where you might pick up some ideas for interiors or maybe feel like giving that sewing pattern a go or perhaps testing out a cake I've baked. Let's just see how it goes. 


So welcome to 'The Hearty Home', I hope you find something here that interests you. 

Amy x