Japanese utility wear is a current trend right?!
Because if it isn't I'm about to start the trend myself(even if I do say so myself!!!)
I have been on the hunt for a tutorial on one of these aprons for a while now. If you follow me on Pintrest you'll see I've pinned a few pictures for inspiration over the past few months but couldn't find a tutorial for what I thought would be an easy make.
 |
Both imagines found some where on Pintrest.  |
Maybe I couldn't find a tutorial because it turns out they're so darn tootin easy to make. You probably won't need this tutorial but you've got it if you want it..
So this is the picture from Pintrest I used for my inspiration....

There was some suggestion of measurements with this picture but I just measured myself and made it off those measurements instead.
First of all I'm a size UK12 (34" Chest) use these measurements if you wish but it is super simple to measure yourself so I'd just do that if I were you.
Oh and fabric choices. This was the hardest part, probably because I didn't know what I wanted (just a tip; it is always best to know what you're looking for before you go fabric shopping.)I ended up with a really basic polyester/viscose in charcoal grey and at £3.99 per metre from the Fancy Silk Store in Birmingham, I was most impressed! I wanted something linen(esq) but it's so expressive so this was a perfect substitute.

 |
Lazy for not cutting off the selvedges, tut!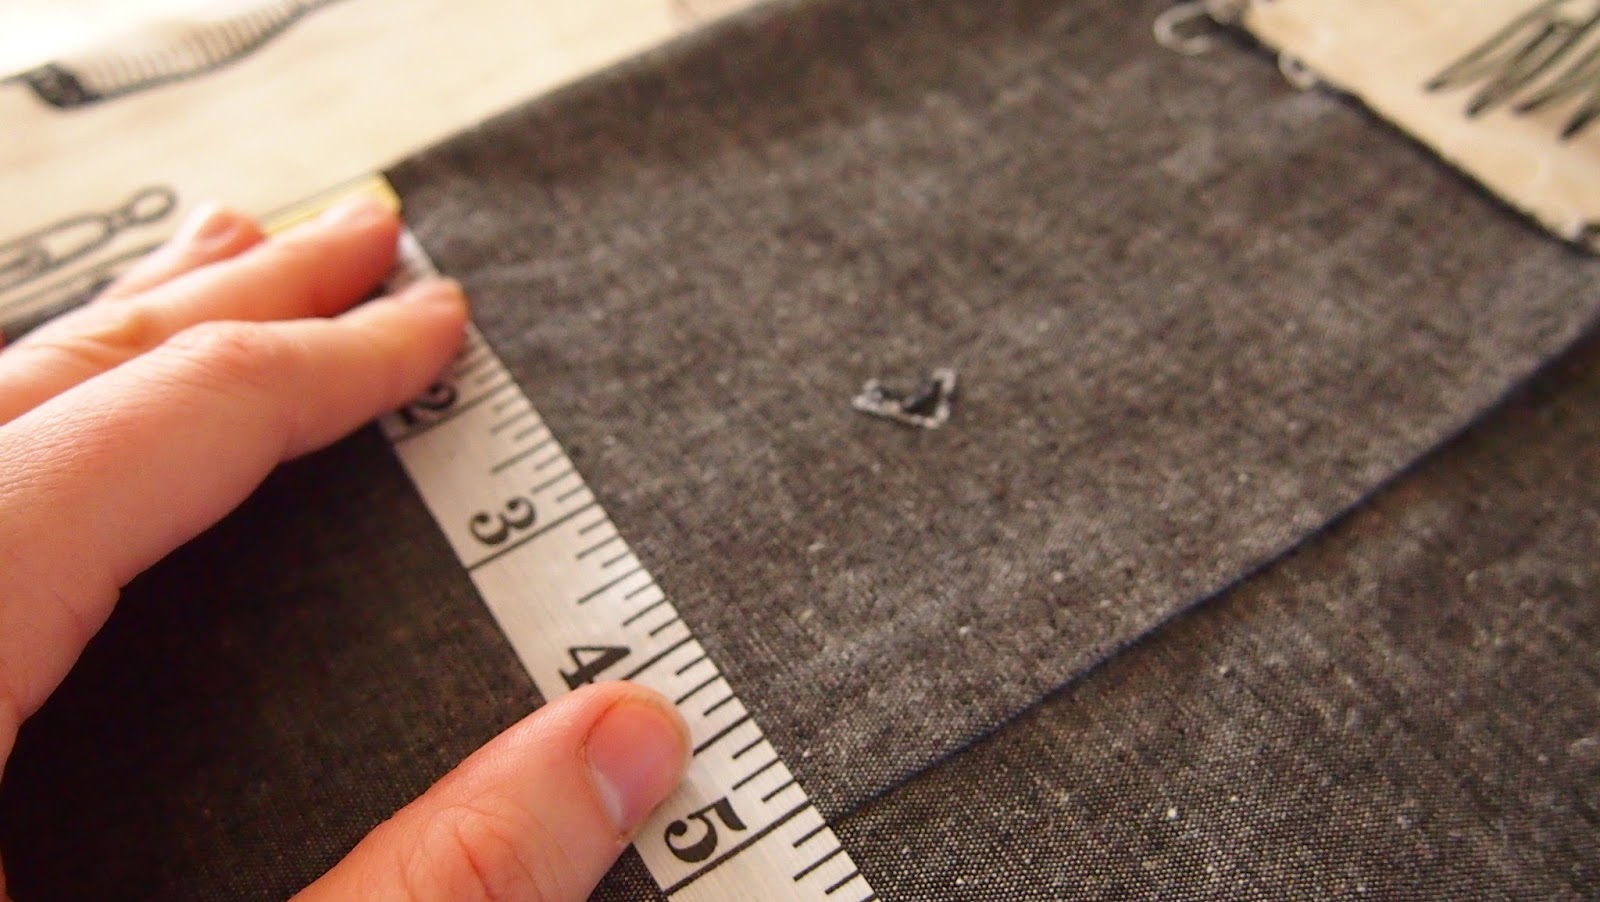
I started off by hemming what would be the top of the apron. I folded it over by 1/2" and pressed. I then folded it over again, so that wrong sides were together, by 5". This will be the facing of the apron. You could maybe put on some interface at this point
to make it stiffer but I didn't have any and now I have the finished product I really don't think it is necessary.
I then double stitched (is that what I mean?!) along the hem. I think the parallel stitching just adds a bit of detail and denim is always stitched like this. It just looks a little more professional don't ya think??

Next up, you have to hem the sides. I didn't hem the bottom of the apron at this point. Like most (all) projects you leave this bit till the end so that you can sew it to the desired length.
Now on to the straps. I cut two pieces of fabric, on the fold that measure 6 cm by 55 cm. (When opened up they would measure 12cm).
 
Hopefully these pictures will help with my
description of how to cut the straps.
 And to add a little detail to the straps I just cut them into points. And to add a little detail to the straps I just cut them into points. |
I then made sure that my straps where folded in half lengthways with right sides together and stitched along the long sides and around the pointy ends of each strap (leave the short straight end open). When you do this bit make sure your stitching along the pointy ends is perfect, or else when you turn your straps the right side out they will look wonky and that just won't do.
 |
| Enter wonkyness that needed to be corrected. |
 |
| Next I pinned the straps to the top of the large piece of fabric... |

 |
| Next up, I attached the end of the straps to the back of the apron. |
Ok, I know I'm not going to describe this next step very well so hopeful the picture above will help. You have to take one strap and pin the end to the opposite side of the back of the apron and then take the other strap and pin that end to the opposite side of the back of the apron. The straps will cross over each other, as the picture above shows.

 Now to stitch them in place. I decided to stitch right around the top of the apron, I felt it would look more finished. If you decide to do this then may I suggest you stop when you get to the tabs at the front of the apron. Just don't stitch across the front of the tabs, I think it looks nice and tidy the way I did it...
Next up, hemming the bottom of the apron...
I cut my apron at the bottom so that it would be 85cm long. I hemmed it by folding and pressing it up by 1/2" and then 1/2" again. I then double stitched, as I did on the facing, along the bottom of the apron.
So the main part of the apron is complete... you could leave it there but I decided to add a little (actually turned out pretty big!!) patch pocket.
And we're done....


I'm so happy with this super simple make, really happy. I'm sure people will look at me in the street and think "Why is that crazy lady wearing her apron out and about?" and I'm not sure I really care all that much! Handmade Japanese Utility Wear is the next big thing, you heard it here first ;-)
Hope my first tutorial makes sense!
Enjoy,
Amy x


.jpg)


I love this! I also pinned those aprons and actually have a paper pattern printed out somewhere, thanks for the reminder, need to dig it out! xx
ReplyDeletego for it! I love it!
DeleteIt's fabulous! Thank you so much :)
DeleteVery nice tutorial, I' m going to give it a try. Thank you for sharing .
ReplyDeleteGreat tutorial will have to give it a try!
ReplyDeleteLove Love Love your tutorial! A Big Thank You from Texas!
ReplyDeleteThank you for your pics and instructions. Great idea re. Pocket! Just putting the final touches to one. May add poppers to one end of shoulder straps as they're a bit short (used fabric left over from shortening the apron).
ReplyDeletejust what I've been looking for, thank you so much x
ReplyDeleteYes! Thank you SO much! This is exactly what I have been looking for!
ReplyDeleteAbsolutely perfect tutorial. Been looking for one for a while. Thanks sewwww much!
ReplyDeleteThanks for sharing all this. I too have pinned quite a few but haven't had a pattern to make one... I will take the plunge!
ReplyDeleteHi, Thank you so much for this tutorial. It has been several years now that I wanted to make one of these aprons. Your tutorial has been very helpful and I know that I can do this now. Going to the fabric store tonight after work.
ReplyDeleteHow much fabric do you need for the apron?
ReplyDeleteGreat blog entry. You've inspired me to go ahead and make one!!
ReplyDeleteThis is on my to do list, your tutorial might just have moved it up the list as that really does sound like a quick project. (and I love a quick project!)
ReplyDeleteHi Amy, one bit of confusion for me...the 120 cm the measurement that goes around your body...yes?
ReplyDeleteI have 2 pieces of linen that are the perfect size. I will attempt to make time tomorrow. Thank you so much!
Froma
thank you forma sharing¡excelent tutorial¡
ReplyDeleteHi Amy, thanks for your tutorial :) I would love to have seen a photo of you showing the back of the apron as I want one that has full coverage at the back rather than a gap as some aprons have. I'm not a slim person, so I'm thinking this would affect how it wraps around my body. Perhaps I need to grab some fabric and try wrapping it around me to see how it drapes. I'm not good at visualising things in my head!
ReplyDeleteGreat wanted to make one of these for an age ..thank you lady Cx
ReplyDeleteWhat a great idea! Much better as a gift than something frilly. And also it looks like you are ready for anything. X
ReplyDeleteFab tutorial...thanks for sharing.
ReplyDeleteFab tutorial...thanks for sharing.
ReplyDeleteI love it!!!!! You did an awesome job and it looks great on you :))
ReplyDeleteHej- Hi! Thank you very much for this very nice tutorial! My apron is ready now and I have enjoyed every minute of this creative new year's afternoon! Wish you a fantastic new year! Kind regards from Helena in Sweden ��
ReplyDeleteGlad you enjoyed it and thanks for your lovely comment, it means a lot.
DeleteI'm so glad I found this , I don't want to wear as an apron but as a 'smock' ( I'm a Girl of the '70's) , however I'm a fatty , can you tell me if it will cross at the back enough to cover my Bum ? Thanks for the tutorial.
ReplyDeleteAre there any photos of the back? I made a similar apron but ended up needing to attach fasteners to the back due to lack of coverage.
ReplyDeleteThanks!
-Cat
Spot on with this article, I really think this website needs more attention. I'll probably be back to read more, thanks for the info.
ReplyDeleteGroomers Aprons
super cute!
ReplyDeleteLovely! Post a picture of the back please.
ReplyDeleteNice tutorial.
ReplyDeleteFabulous thank you. Have this on my list of things to do but was a little lazy in working it out..but now you have I'm off to Birmingham Markets or Fancy Silk Store to grab some fabric..think I fancy ticking x
ReplyDeletereally good tutorial, thanks for posting xx
ReplyDeleteJust what I needed for my workshop apron. (I'm a NZ tech teacher) Thank you very much.
ReplyDeleteSo super helpful! Appreciate it!
ReplyDeleteHi Amy I too couldn't find a pattern. thanks to you I can now make one. It looked simple but I needed someone to show me how to make the pattern. I am appreciate it.
ReplyDeleteI'm new to sewing, I mean like really new. I've just bought my first sewing machine & I've decided to make this my first project! Wish me luck.
ReplyDeleteHi, Sorry for the late arrival but is the body of the apron just one big rectangle? Thank you so much for sharing this with all of us!!
ReplyDeleteSo helpful, I've also been pinning these aprons and assumed it would be much more complicated. Can't wait to make one. Thanks!!!
ReplyDeletePurl had instructions for one on their blog...https://www.purlsoho.com/create/2016/07/06/cross-back-apron-in-watercolor-linen/
ReplyDeleteNice!
ReplyDeleteJapanese style is not very to my taste, I think it is often very bright. I read the article https://scallywagandvagabond.com/2018/10/style-guide-skull-jewelry-fashion-accessory-must-have/ and realized that I fit such accessories along with casual clothes or kaganoi jacket.
ReplyDeleteI am going to make mine out of painters drop cloths. The ones that are kinda like canvas. I want mine to be a little more tougher than just regular material. Thanks for the tutorial!
ReplyDeleteHere i found nice environment to get new ideas and views and the i have read the comments of Vero Beach Tutoring
ReplyDeletethis blog and these are really nice and it is glad to comment here.
I would very much like to agree with the previous commenter! I find this blog really useful for my uni project. Longboat Key Tutoring I hope to add more useful posts later.
ReplyDeleteThank you. I enjoyed your post and the tutorial is helpful. Cheers!
ReplyDeletethanks bunches! I've been on the prowl a while now. Found some fabulous muslin to start with.
ReplyDeleteIts wonderful blog really very nice site and blog facility.every title is very nice and very fatastic concept.Special needs Tutor Alpine Thanks for sharing the information.
ReplyDeleteThis looks like an easy pattern to follow & make. I like the idea of not having to tie strings to keep it on. I like the look of the crossbody straps.
ReplyDeleteShop premium aprons online at Stridex Clothing. Discover stylish, durable, and comfortable designs perfect for cooking, baking, and professional use. Upgrade your kitchen look with quality aprons today.
ReplyDelete